今天刚搞懂了这东西,睡前一定要记下来

首先一定要对 go-zero 和 JWT 有些基础,不然你大概不知道我在 BB 什么

建议把官网上的 demo 都跑一下


我以一个单体服务开始讲,以下是 api 文件

1
2
3
4
5
6
7
8
9
10
11
12
13
14
15
16
17
18
19
20
21
22
23
24
25
26
27
28
29
30
31
32
33
34
syntax = "v1"

service user {
@handler login
get /login(LoginRequest) returns (LoginReply)

}

@server(
jwt: Auth
)
service user {
@handler userInfo
get /user_info(UserInfoRequest) returns (UserInfoReply)
}

// 目前仅测试 JWT 功能,能否从 token 中获取 user_type
type (

// 登录服务
LoginRequest {
UserType uint8 `form:"user_type"`
}
LoginReply {
Token string `json:"token"`
}

// 用户信息
UserInfoRequest {
}
UserInfoReply {
UserType uint8 `json:"user_type"`
}
)

为了简洁,我抛开账号密码不谈,认定访问就登录了,然后为了说明 JWT 的存储功能,我会在 JWT 中存一个 UserType ,然后尝试在访问 /user_info 时从 JWT 读取并打印出来
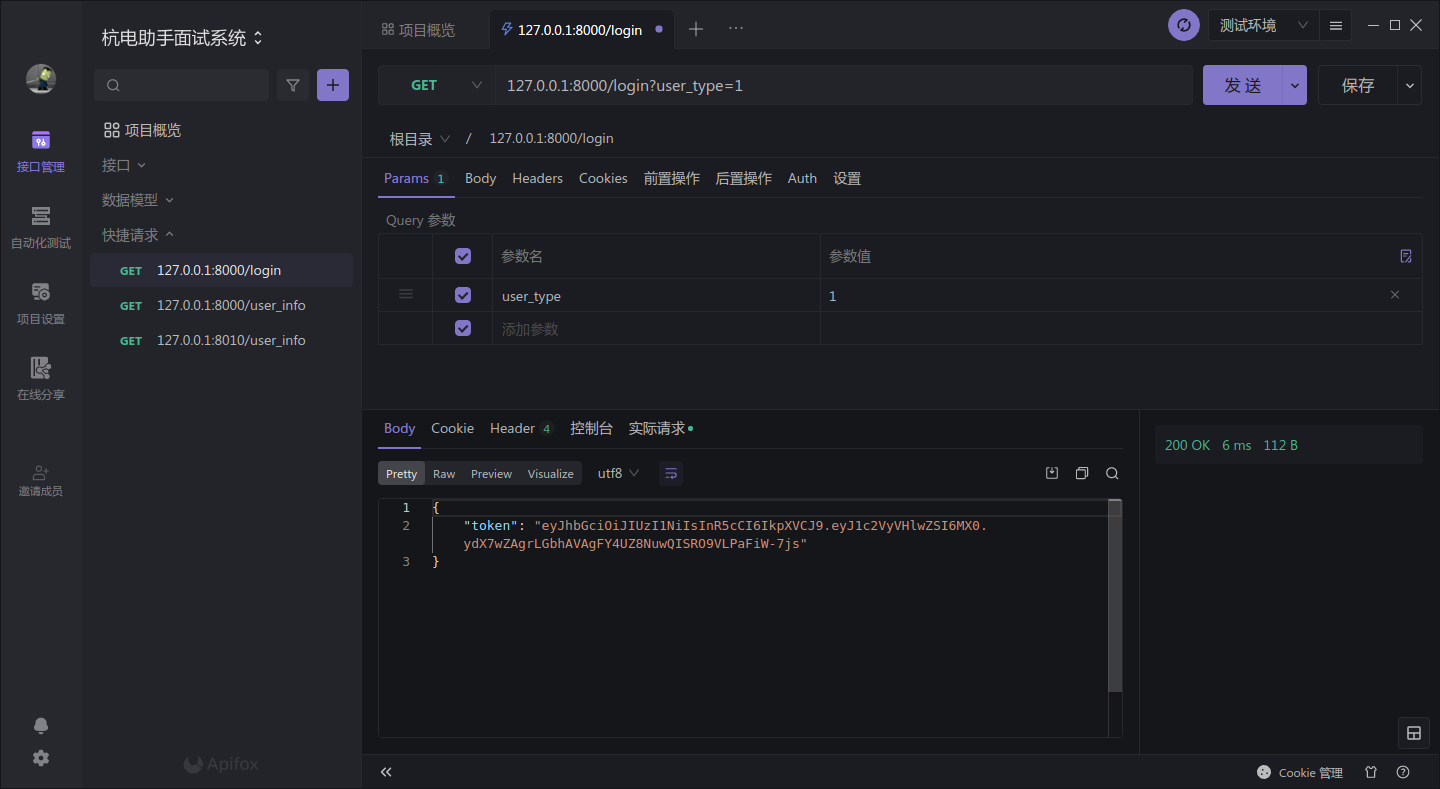

生成并传递 token

首先,在 /etc/user.yaml 中把 AccessSecretAccessExpire 先定义好

1
2
3
4
5
6
7
8
Name: user
Host: 0.0.0.0
Port: 8000


Auth:
AccessSecret: ThisIsMySecret
AccessExpire: 3600

AccessSecret 是用来签名的,保证这个 token 不是别人乱编出来的,一定是在你这里生成的,它可用是一个随意的字符串,但是一定不能泄露,不然就麻烦了

AccessExpire 是可用的时间,单位为秒,鉴权时 go-zero 会自动帮你检查时间的

然后在 /internal/config/config.go 中加入这两个信息

1
2
3
4
5
6
7
8
9
10
11
package config

import "github.com/zeromicro/go-zero/rest"

type Config struct {
rest.RestConf
Auth struct {
AccessSecret string
AccessExpire int64
}
}

接着,准备一个生成 token 的函数

1
2
3
4
5
6
func (l *LoginLogic) newJwtToken(userType uint8) (string, error) {
claims := make(jwt.MapClaims)
claims["userType"] = userType
token := jwt.NewWithClaims(jwt.SigningMethodHS256, claims)
return token.SignedString([]byte(l.svcCtx.Config.Auth.AccessSecret))
}

在生成 token 的时候,可以往里面保存数据,但是请注意了,这个是不被加密的,重要的东西不能往里面写

然后在 /internal/logic/loginlogic.go 中完善登录方法

1
2
3
4
5
6
7
8
func (l *LoginLogic) Login(req *types.LoginRequest) (resp *types.LoginReply, err error) {

accessToken, err := l.newJwtToken(req.UserType)
if err != nil {
return nil, err
}
return &types.LoginReply{Token: accessToken}, nil
}

这就可以了,去请求看看

image-20221005003749420

其实还有注意的一点是往 JWT 里面的参数要搞一些会变化的值(例如时间什么的)

在这里,如果重复请求的话返回值其实是一样的

1
eyJhbGciOiJIUzI1NiIsInR5cCI6IkpXVCJ9.eyJ1c2VyVHlwZSI6MX0.ydX7wZAgrLGbhAVAgFY4UZ8NuwQISRO9VLPaFiW-7js

更改 user_type 为 3 ,再拿一个 token
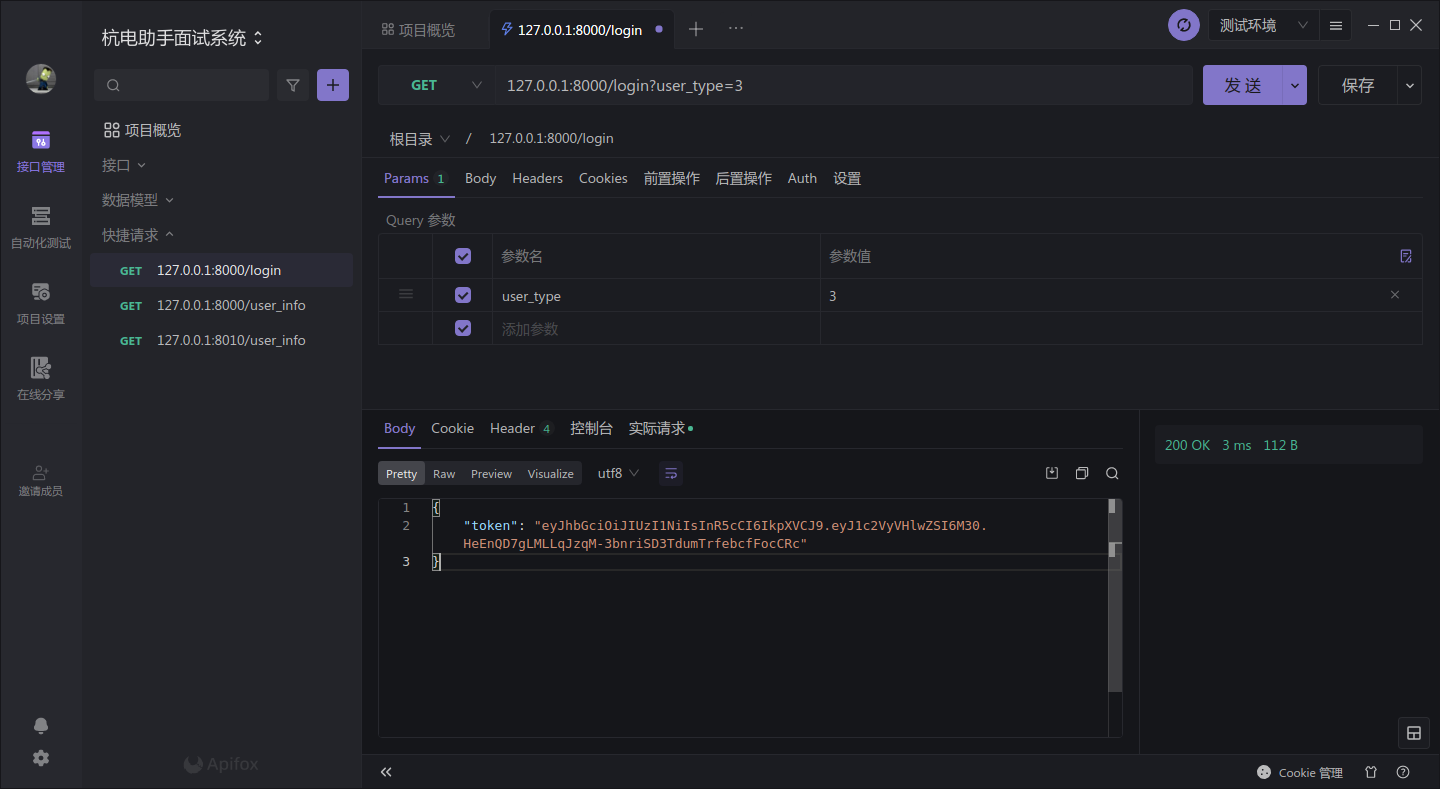
image-20221005004148335

1
eyJhbGciOiJIUzI1NiIsInR5cCI6IkpXVCJ9.eyJ1c2VyVHlwZSI6M30.HeEnQD7gLMLLqJzqM-3bnriSD3TdumTrfebcfFocCRc

在访问时鉴权

这个其实很简单,在 service 上面加 3 行就行了
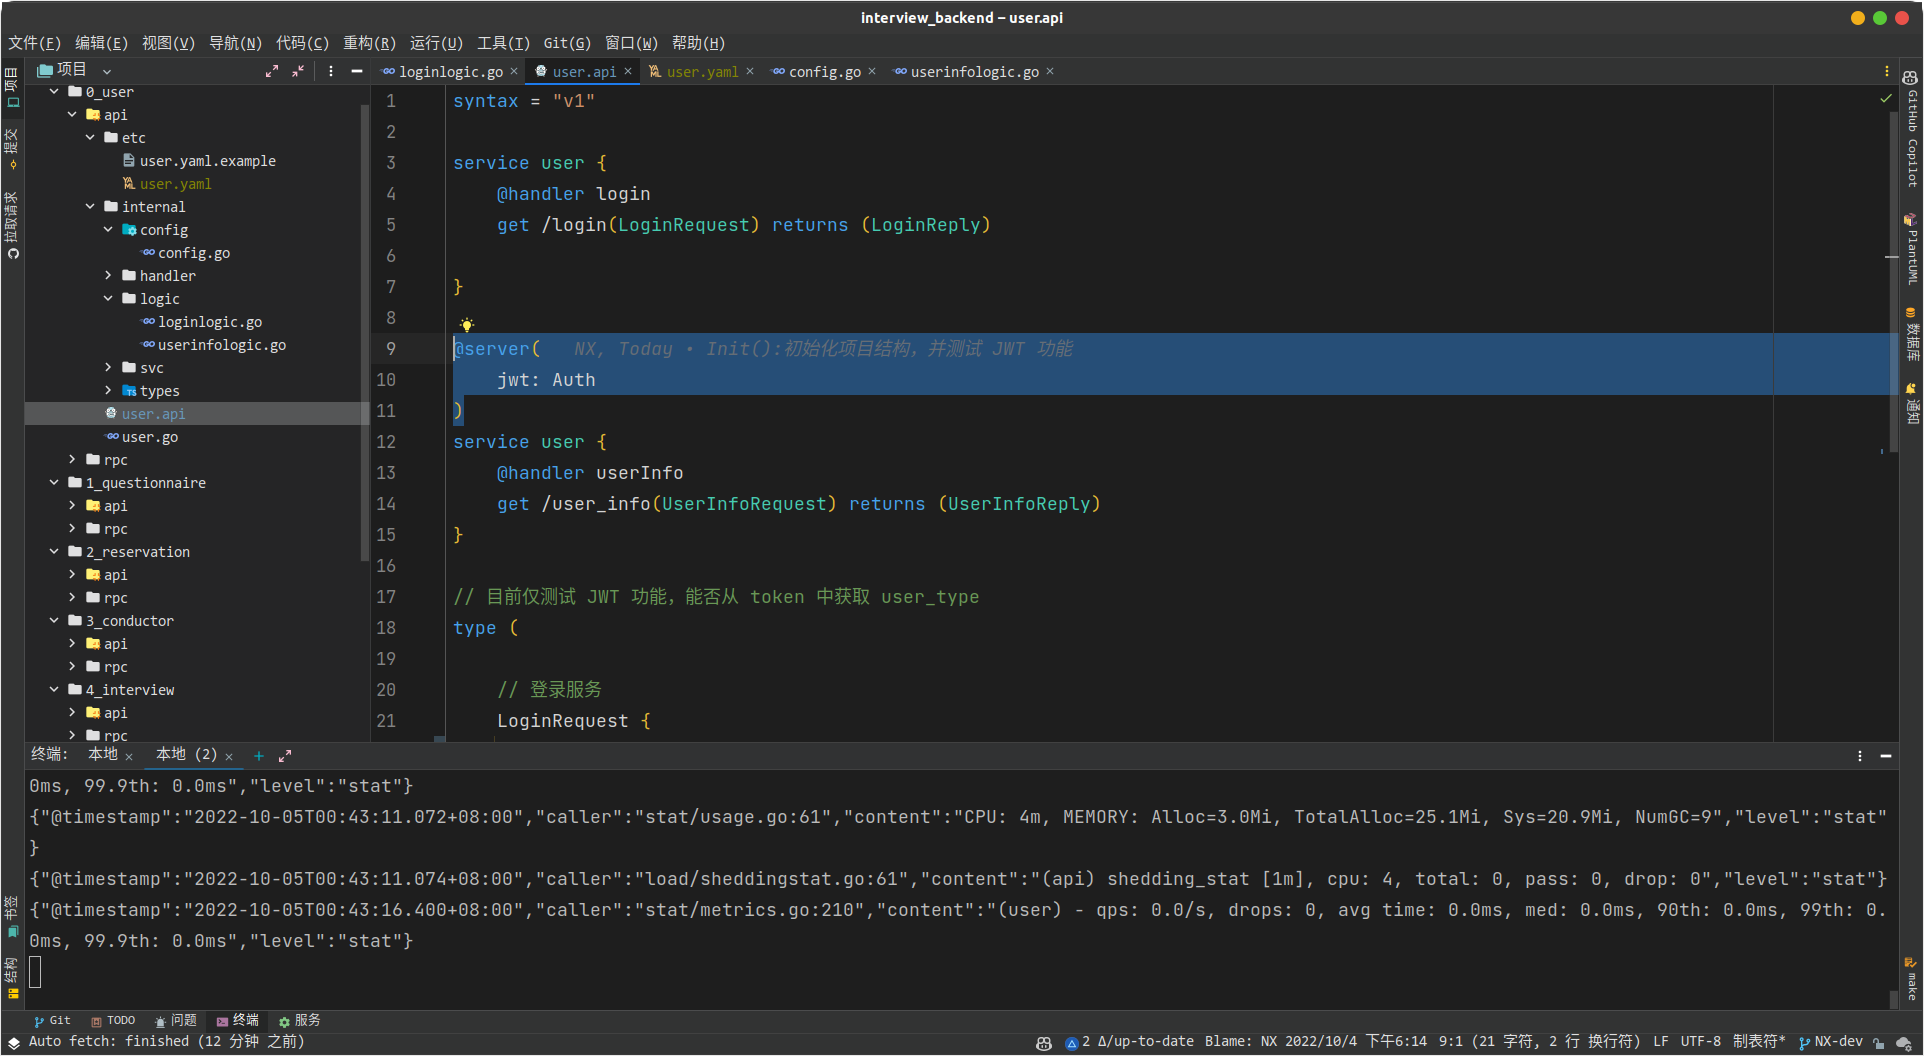
image-20221005004341969

不加就是访问的时候不走 JWT

然后去 /internal/logic/userinfologic.go 完善 UserInfo 方法

1
2
3
4
5
6
7
8
9
10
11
12
13
14
15
func (l *UserInfoLogic) UserInfo(req *types.UserInfoRequest) (resp *types.UserInfoReply, err error) {

userTypeInJSON, ok := l.ctx.Value("userType").(json.Number)

//fmt.Printf("%T\n", l.ctx.Value("userType")) // json.Number
fmt.Println(userTypeInJSON, ok)

userTypeInInt64, err := userTypeInJSON.Int64()

userType := uint8(userTypeInInt64)

return &types.UserInfoReply{
UserType: userType,
}, nil
}

使用 l.ctx.Value("userType") 即可拿出保存的数据

要注意的是取出来的是 json.Number 类型,要转换

这样就可以了,去请求看看

在头部的 Authorization 传入 token

image-20221005004817984

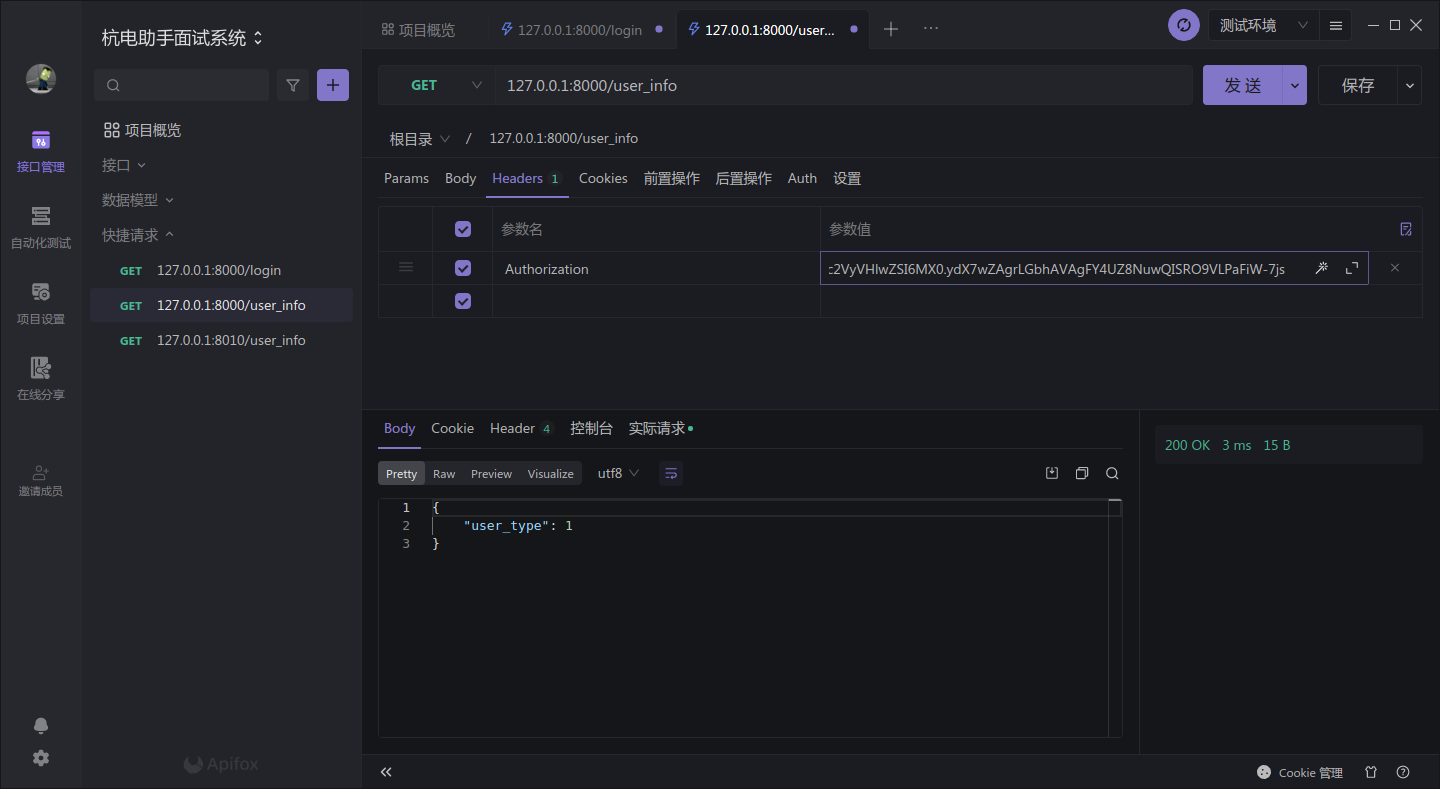
再传入那个 user_type 为 3 的

image-20221005004914185

非常完美,就是这样


在微服务场景的使用

JWT 有个特性,就是只要配置的密钥相同,就能相互认同

也就是说,在 A 处拿到的 token,只要 B 使用的密钥和 A 一样,就可以在 B 处使用

另外创建一个服务,在 yaml 中和 config.go 中做相同的修改

复制一份 api 文件,但其实只测试鉴权,我就只保留鉴权的部分了

1
2
3
4
5
6
7
8
9
10
11
12
13
14
15
16
17
18
19
20
syntax = "v1"

@server(
jwt: Auth
)
service questionnaire {
@handler userInfo
get /user_info(UserInfoRequest) returns (UserInfoReply)
}

// 目前仅测试 JWT 功能,能否从 token 中获取 user_type
type (

// 用户信息
UserInfoRequest {
}
UserInfoReply {
UserType uint8 `json:"user_type"`
}
)

然后方法逻辑也不用说了,一样的

image-20221005005516909

image-20221005005535538

也是一样的完美运行